This EasyStep will show you how to set the time in your EC1 from the time in your PC. It's quick and it's easy. You will also learn how to incorporate the tiny bit of required SPLat code into your own SPLat programs.
It should take you no more than an hour to go through this, providing you already understand the fundamentals of SPLat programming.
The EC1 is unique among very low cost microcontroller boards in that it has an onboard calendar/clock, often called RealTime Clock (RTC). The RTC provides a full calendar and time of day clock, as well as advanced features like programmable events that can be set to go off at specified times on selected days of the week. In short, the RTC has enough features to let you program elaborate time-clock functionality into your EC1-based project.
Note: Don't confuse the RTC with the basic ability to generate time intervals. SPLat has a rich set of interval related instructions like Pause, which handle the passage of time. These don't exist as native functions in most other microcontroller boards. The RTC takes it to a higher level again by knowing what the date and time are.
What you will need
- An EC1 all ready to plug into your PC via USB;
- SPLat/PC installed and running, and the basic skills to enter and download programs.
Before starting on this, please be sure to have completed the EasyStep Connecting a battery to your EC1 for the realtime clock
Overview
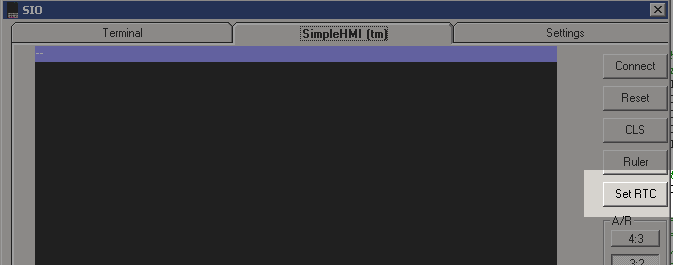
The RTC setting capability is contained within the SimpleHMI client in SPLat/PC. The SimpleHMI has a button next to the SimpleHMI screen. When clicked it will set the date and time to a connected EC1. If the EC1 is running a tiny bit of special code, the result will be that the RTC in the EC1 is set to the time and date in your PC.

The bare bones
If you include the following two lines of code in your program, near the top (and definitely before a RunTasksForever), your program will be able to have the time set by cicking the Set RTC button illustrated above. As with all hash commands and functions, this requires your program to be running MultiTrack.# Open_Serial User(38400, 8, N) ;Goes to SimpleHMI in the PC (inside SPLat/PC or standalone version) # HMI SetRTCEvent()
The first line opens the default communications port, which is the USB programming port, and makes it available for use by your program. There is a 10 second delay before that comes into effect (the reason for that delay should be clear shortly).
The second line causes a whole pile of under-the-hood code to be activated, which provides the capability of receiving a time-setting message from the SimpleHMI device (in this case the PC) and updating the onboard RTC with time and date.
A more elaborate template program
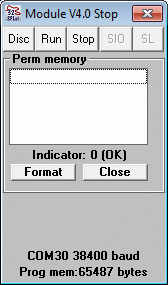
The above two lines of code have one drawback: SPLat/PC, and the SimpleHMI client that you can run from inside SPLat/PC, are two quite separate entities. Once the communications port has been opened for SimpleHMI use by the running application, it is no longer available to SPLat/PC for programming the board. The only away to give control back to SPLat/PC is to restart the program and the hit the Stop button in the SPLat/PC Module window within 10 seconds. There are two ways to restart the program:
- Cycle the power, by unplugging and re-plugging the USB (assuming you are powering the board off USB). Then hit the Stop button within 10 seconds. This method is inconvenient. Also, the USB drivers in Windows get upset by unplugging, and it may be difficult to get the PC to re-activate the port within 10 seconds;
- Do a bit of skullduggery in the SPLat program so it can be forced to crash. This always forces a restart of the program.
The following program does a number of things
- At startup it turns on both LEDs and waits for you to press the button on the EC1. While both LEDs are on
you can click the Stop or Connect buttons on the SPLat/PC Module window, and get connected to the board;

- The green LED flashes to tell you the program is running ("heart beat"). This will not happen until 10s after the program started and the EC1 button has been pressed;
- Any subsequent short press on the EC1 push button forces the RTC to be updated from the SimpleHMI client in SPLat/PC;
- A click of the Set RTC button on the SimpleHMI window in SPLat/PC also forces the RTC to be updated;
- The red LED flashes briefly when the RTC time and date are sent from SimpleHMI;
- A long (2s) press on the EC1 push button deliberately crashes the program (Kill switch function). The program restarts, turns on both LEDs and will respond to the Stop or Connect buttons on the SPLat/PC Module window;
The full program is listed below, with extensive annotations. To show/hide the program listing click here. There are pop-ups for each major functional block of code, and clickable links on individual instructions that take you to the formal descriptions of the instructions.
The block annotations are marked like this:
;[...]Place your mouse over that line to see a pop-up describing the overall logic of the block.
Many instruction also have clickable links to the formal definition online. (Tip: Click the link with your mouse wheel to open in a new browser tab)
Please invest some time studying the program. Even if you don't understand all the details, try to at least get the general drift of what the major blocks are all about.
Take back control
When you have explored everything the program can do, you need to stop it running and give control of the EC1 back to SPLat/PC.
- Press and hold the EC1 button for 2 seconds. Both LEDs should come on. You have just triggered the killswitch function,
and the program has restarted. Click the Stop button on the Module window of SPLat/PC (or the Connect button, if it is showing)

The Module window should expand, and stay expanded.

- You will get a pop-up error message. This happens because the killswitch deliberately crashes the program. Dismiss the error message.
You have successfully stopped the program and given SPLat/PC control of the board, ready to change the program.

